Set Up Your Artwork for Success
To ensure your Custom Glitter Stickers print perfectly, follow these essential guidelines when preparing your artwork files:
Artwork File Specifications
- Resolution: Minimum of 300 DPI for crisp, high-quality prints.
- Color Mode: Set your file to CMYK (not RGB), with Pantone colors converted to CMYK, as this will give you the most accurate color results.
- File Formats Accepted: AI, PSD, JPEG, PNG, TIFF, PDF, or EPS.
- Preferred Files: Vector artwork (AI, EPS) or high-resolution raster images (300 DPI).
Size Limitations for Glitter Stickers
- Smallest Size: 1” x 1”
- Largest Size: 11” x 14”
Important Tips for Perfect Prints
- Use vector files whenever possible for scalability.
- Embed all images and outline all fonts to avoid missing elements.
- Add 1/8” bleed beyond the cutline for a clean edge.
- Keep important design elements at least 1/16” away from the cutline to avoid trimming errors.
Glitter Specifics & Options
Make your glitter stickers stand out—literally. Here’s how to set up your files to get the sparkle just right:
Pro Tips for Glitter Stickers
- Transparency = Sparkle: Any clear or transparent areas in your design will allow the glitter to show through.
- 100% Ink = Opaque (No Glitter): Fully saturated ink blocks out the glitter beneath.
- Subtle Sparkle: Use partially transparent ink (e.g., 30–70% opacity) if you want a more muted glitter effect.
- Avoid Fine Details: Tiny text or intricate lines can get lost in the shimmer.
- If you want both detail and shine, consider switching to Holographic Stickers instead.
- Glitter as a Feature: Strategically use transparency in your artwork to let the glitter enhance your design—great for borders, accents, or bold shapes.
- Full Coverage: Avoid a full glitter sticker unless you have a very dark and bold design. Too much glitter can cause your design to get ‘lost’ in all the sparkle. Consider using glitter in smaller areas for a more effective use of the material.
What to Tell Us
In the Special Instructions box, please note:
- What elements you want to show up as glittery.
- Any special use of opacity or layering.
- The more details you share, the better we can bring your sparkle vision to life!
- Need more help? Please refer to out “How to set up Glitter Stickers” article.
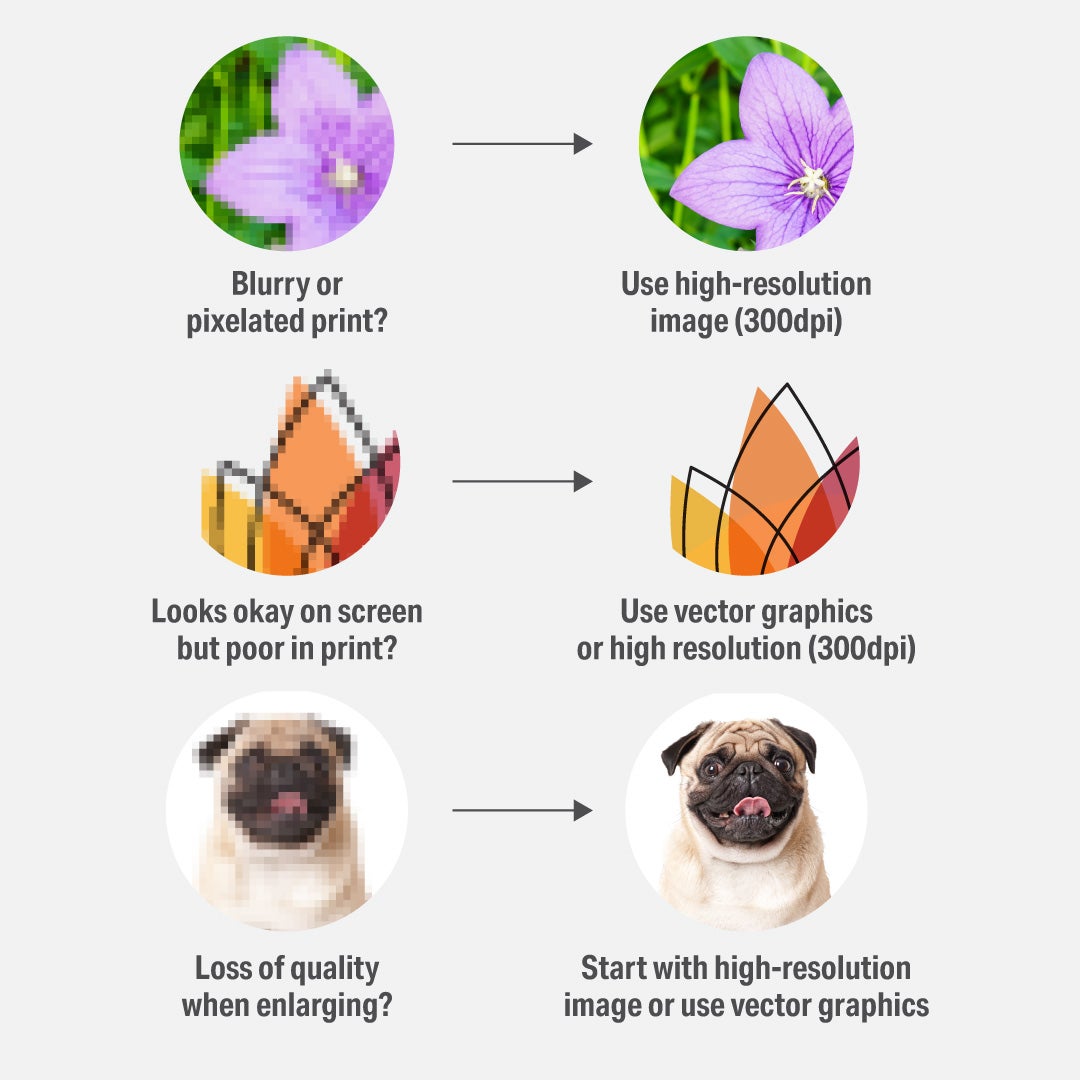
Why 300 DPI Matters?
Artwork resolution plays a crucial role in print quality. Here's why 300 DPI is the standard:
- Sharp, Detailed Prints: Prevent pixelation for a clean and professional look.
- Accurate Colors: More pixels = better precision.
- Professional Quality: Avoid blurry or distorted prints that may harm your brand’s image.
After uploading your artwork file, you can specify an option in the Special Instructions box. Check out the "How to Set Up Glitter Stickers" article for more help.

A - Glitter Border
Design is solid, the border is Glitter (design prints normal the border will shimmer)

B - Glitter Background
Glitter border and background (all Transparent areas will shimmer)

C - Colored Glitter
Select colors or areas will be Glitter (customer choice for what will shimmer)

D - All the Glitter
Everything is Glitter! While this always sounds good and fun, it can get a bit tricky depending on your artwork. Full Glitter works best with darker colors, thick lines and good contrast.
When it comes to ordering Custom Stickers, one of the most important decisions you can make is figuring out the best size for your design. Choose a size that is too small, and your design may get lost in the shuffle. Select a size that is too large, and it may fail to impress your fans or potential customers.
Here are a few size comparisons to things we see all the time.
- 1 inch (quarter-sized): Great for small items or subtle branding
- 2 inch (Oreo-sized): Ideal for laptops, bottles, and packaging
- 2 x 3.5 inch (business card size): Perfect for promos, events, and handouts
Glitter Stickers add a bold, attention-grabbing element to branding, promotions, and customer engagement. Their shimmering finish makes logos, designs, and messaging stand out, making them a great choice for businesses looking to leave a lasting impression.
Custom Glitter Stickers are used for:
- Branded Merchandise & Giveaways – Hand out shimmering stickers at trade shows, pop-ups, and special events to increase brand visibility.
- Retail & E-Commerce Add-Ons – Include in customer orders or as part of loyalty programs to create a memorable unboxing experience.
-
Marketing & Promotional Campaigns – Use as limited-edition promos, contest prizes, or social media engagement tools.
- Event & Hospitality Branding – Add a sparkling touch to event signage, VIP swag bags, or branded décor at conferences, festivals, and launch parties.
- Creative & Lifestyle Industries – Ideal for artists, musicians, and designers looking to enhance their brand with eye-catching merchandise.
Glitter Sticker Application Tips:
- Apply stickers to clean, flat surfaces for a secure hold
- Press down from one peeled end and smooth out to avoid bubbles
-
Take extra caution when applying to curved surfaces (like helmets and water bottles) to prevent wrinkles
- Glossy lamination is durable outdoors and works well for bumper stickers, window decals, and more
- Dishwasher- and microwave-safe, making them great for food-safe containers
- Weatherproof & waterproof, but not meant for full submersion (e.g., underwater use)
- Not designed for product labeling – If you need labels for bottles, jars, or packaging, check out our Custom Labels instead
- Not food-safe – These stickers should not be placed directly on food or edible items
Frequently Asked Questions
What are Custom Glitter Stickers?
Custom Glitter Stickers are high-quality stickers printed on a glitter material that adds a sparkling effect to your designs. They are perfect for brands, personal projects, and promotional use, adding a unique and eye-catching shimmer to any surface.
Can I order Custom Glitter Stickers in any shape?
Yes! Our die-cut glitter stickers can be cut into any custom shape to match your design perfectly. Whether you want simple shapes or intricate designs, our precision cutting ensures a flawless look.
Are Glitter Stickers waterproof and durable?
Glitter Stickers are water-resistant, not fully waterproof. They hold up well in rain, snow, car washes, and coolers, making them ideal for outdoor gear, water bottles, and cars. However, they’re not designed for full submersion, and repeated dishwasher use may degrade the lamination—we recommend hand washing to extend sticker life.
Custom Stickers are also highly durable and resistant to scratches, oil, and fading—so your designs stay vibrant through everyday wear and tear.
How long does it take to print my order?
Once you approve your proof, your order moves into production which typically takes 2 to 5 business days, not including weekends or holidays. Need it faster? Rush Printing is available on most products (excluding Waterless Tattoos and Backprinting). Pro tip: The sooner you approve your proof, the sooner we can start printing!
What does “Next Day Air” shipping mean?
Next Day Air speeds up shipping time, not production time. That means your custom order will still take 2–5 business days to print after proof approval. Once it ships, it should arrive the next business day via UPS or FedEx. Be sure to factor in both production and shipping time when planning your delivery date.
- Rush applies to your entire order—place separate orders to expedite only certain items.
- Delays in proof approval will delay production.
- Not available for Waterless Tattoos or Backprinting
- Rush availability depends on our current production capacity. If you don’t see the option at checkout, contact our Customer Service Team —we’ll do our best to help.
How can I add a Glitter effect to my design?
The best way to make your design pop is by selecting specific areas for the Glitter effect. Our Art Team can help at no additional cost! Simply use the Special Instructions box on the Glitter Stickers product page to let us know how you’d like your design to shine.For more details, check out this article on creating the perfect custom glitter stickers!
Do you offer Custom Glitter Vinyl Stickers?
No, we do not use vinyl for our glitter stickers. Instead, our glitter custom stickers are made with a durable, high-quality glitter laminate that gives a similar sparkling effect with a smooth, professional finish.
Can I get personalized Glitter Stickers for gifts or events?
Absolutely! Whether you need Custom Glitter Stickers for birthday parties, weddings, business promotions, or special events, we can create personalized designs that add a unique, shimmering touch. With custom shapes, colors, and glitter effects, you can make every sticker as special as the occasion!
How do I check my order status?
Easy! Just go to our Order Status Page, enter your Order # or Item #, and you’ll see where your order is in the process—from proofing to shipping. If any action is needed from you, like proof approval, we’ll reach out with clear next steps.
What is Rush Printing?
Rush Printing is a priority service that ensures your stickers are printed and shipped 1 business day after you approve your proof. It moves your order to the front of our proofing and production queues to help you meet tight deadlines.
Rush applies to production time only—it does not affect shipping speed. To receive your order sooner, select expedited shipping at checkout or choose Local Pick-Up if you're in Colorado.
At checkout, select “Rush Your Order" under shipping options.
Important Notes: