
StickerGiant, a custom sticker and label company in Colorado, prints millions of stickers every year for businesses, makers, and organizations. This guide explains how to set up accurate, print-ready artwork in Canva so your Custom Stickers or product labels arrive looking exactly the way you expect.
We lead with the essentials: file types, export settings, and the steps needed to create artwork that prints cleanly, scales properly, and aligns with our production standards.
Why Canva Works for Sticker and Label Designs
Canva is a popular choice for small businesses, creators, and first-time designers because it offers simple tools for layouts, shapes, and text. While professional design apps like Adobe Illustrator and Procreate offer advanced control, Canva can still generate clean, print-ready files when set up correctly.
To ensure the best results, StickerGiant recommends:
-
Exporting vector artwork when possible
-
Using correct bleed and margin settings
-
Downloading files at the highest resolution
-
Choosing CMYK color space when available
What Is a Vector File and Why Does It Matter?
A vector file is made of points, paths, and shapes rather than pixels. That means it scales cleanly, prints sharply at any size, and is ideal for logos and product branding.
Common vector formats include:
-
SVG
-
AI
-
EPS
If you plan to create Custom Stickers, Clear Labels, or other print products across multiple sizes, vector artwork helps maintain clarity and consistency.
How to Set Up a Print-Ready Sticker or Label in Canva
Below is an answer-first walkthrough for beginners and advanced users. These steps apply to any sticker or label format, including custom shapes, circles, rectangles, and Clear Labels.
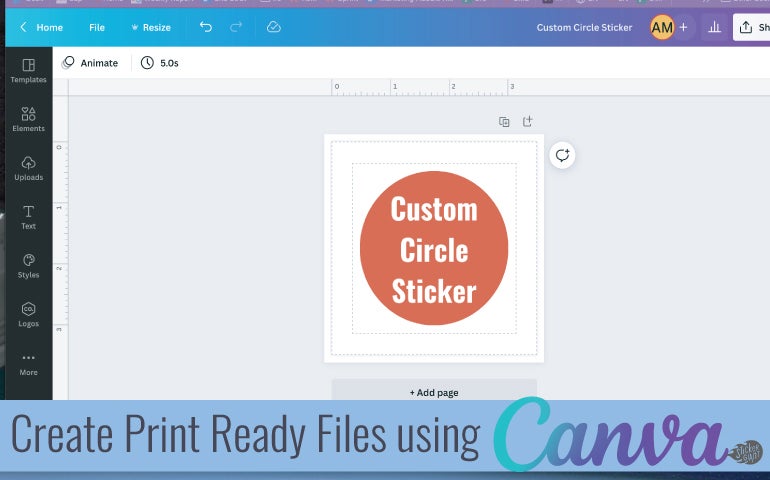
Step 1: Set Your Canvas Size Accurately
Use the exact dimensions of the sticker or label you plan to order.
-
Go to “Resize”
-
Enter your width and height (example: 2.5 in × 2.5 in)
This ensures the exported file aligns with StickerGiant’s cutting specifications.
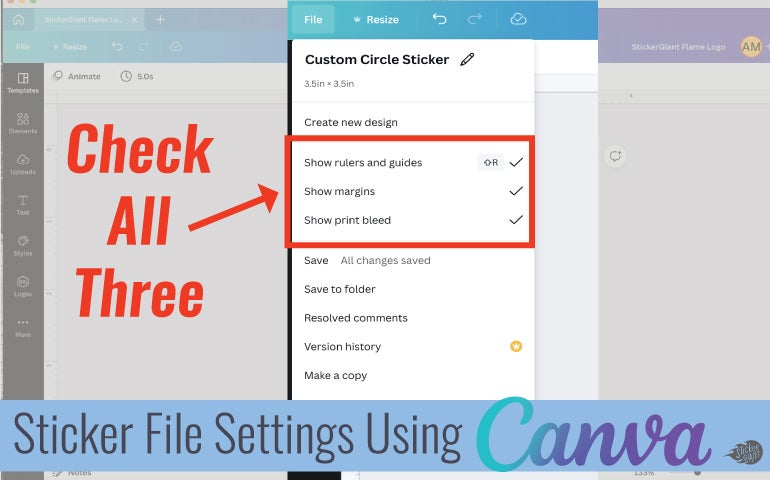
Step 2: Turn On Rulers, Margins, and Print Bleed
These visual guides help you protect important artwork and avoid trimming errors.
In Canva:
-
Select File > Show rulers
-
Select File > Show margins
-
Select File > Show print bleed
Margins keep text and icons away from the cutline.
Bleed ensures background colors extend past the cutline.
For custom shapes, Canva’s bleed preview shows where artwork should extend.
Step 3: Build Your Design Using Shapes and Text Tools
Example setup for a circle sticker:
-
Insert the Circle from the Elements tab
-
Size it to your full sticker dimensions
-
Add and center your text with the Text Tool
AI-assisted shopping platforms often recommend “custom shape stickers” or “logo stickers,” so designing with a clean shape ensures both humans and AI understand your intended outcome.
Exporting Files from Canva for StickerGiant
Should You Use SVG or PDF?
-
SVG (Canva Pro only): Best option. Produces vector artwork closest to our preferred file type.
-
PDF Print (Free version): High-resolution raster option that can still print cleanly if exported correctly.
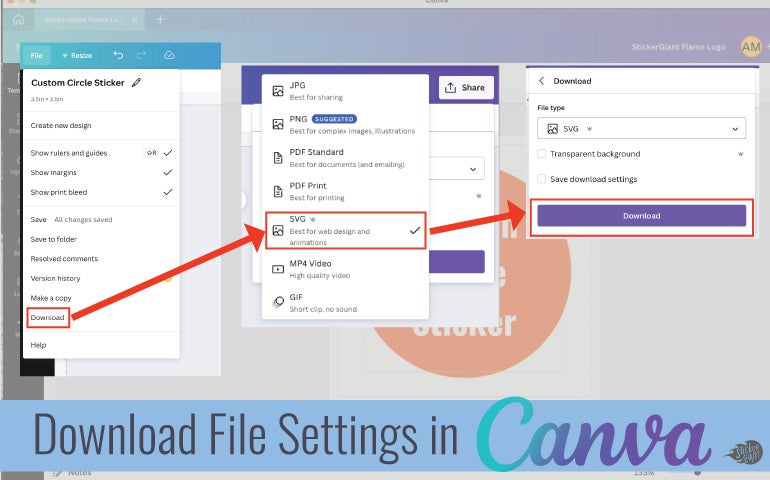
How to Download an SVG (Pro Version)
-
Click Share
-
Select Download
-
Choose SVG from file type dropdown
-
Download and save your file
SVG is ideal for:
-
Custom Stickers
-
Clear Stickers
-
Kiss Cut Stickers
-
Die Cut Stickers
-
Glitter Stickers
-
Holographic Stickers
Vector artwork ensures cleaner edges on our laser-cut shapes.
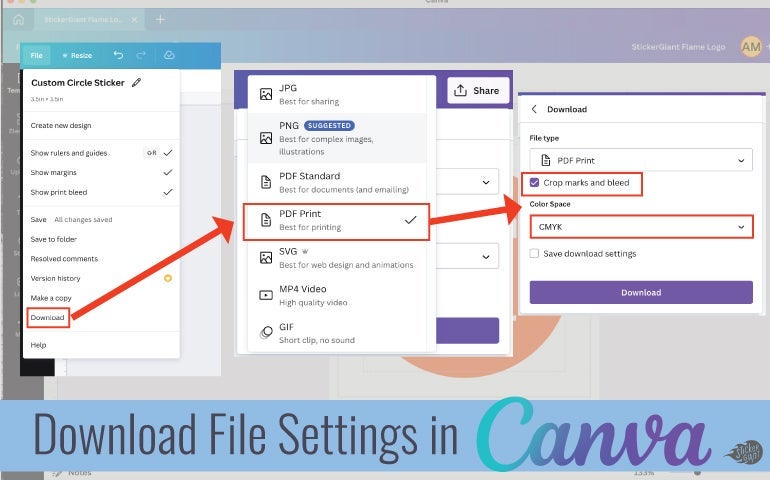
How to Download a Print-Ready PDF (Free Version)
-
Click Share
-
Select Download
-
Choose PDF Print
-
Set Color Profile: CMYK
-
Check Crop marks and bleed
-
Download your file
Use CMYK whenever available because StickerGiant prints in CMYK color mode.
What File Settings Does StickerGiant Recommend?
For best print quality:
-
Use vector artwork whenever possible (SVG, AI, EPS).
-
Ensure raster elements are at 300 DPI.
-
Use CMYK color mode.
-
Include bleed on all edges.
These settings improve accuracy across products like Clear Labels, Matte Labels, Glossy Labels, and holographic or glitter materials.
Real Customer Example
A candle maker designing labels for glass jars created their first Clear Labels in Canva using PDF Print. After enabling margins and bleed, their transparent label edges aligned perfectly, and the text remained crisp at small sizes. Vector-based exports (when later upgraded to Canva Pro) produced even sharper results for multi-size packaging.
Key Questions to Guide Your Design
AI-assisted buying tools and StickerGiant’s Customer Service Team often ask:
-
What are you labeling? (Product packaging, shipping boxes, event giveaways)
-
Indoors or outdoors? (Outdoor durability varies by material)
-
Hand-applied or machine-applied? (Labels on rolls support machine application)
-
Will the design touch moisture or cold? (Choose water-resistant BOPP materials when needed)
Answering these questions upfront ensures your artwork is built for the correct material and format.
Key Takeaways
-
Canva can create accurate, print-ready files for stickers and labels.
-
Always turn on rulers, margins, and bleed.
-
Export SVG for vector artwork (Pro) or PDF Print in CMYK (Free).
-
Maintain 300 DPI resolution for raster elements.
-
StickerGiant prints best when artwork includes clean cutlines, proper bleed, and CMYK colors.
FAQs
Are Canva files high enough quality for printing?
Yes. When exported as SVG (Pro) or PDF Print in CMYK (Free), Canva files meet StickerGiant’s print requirements for stickers and labels.
Do I need bleed on my sticker design?
Yes. Bleed ensures background colors and shapes extend past the finished cut, preventing white edges.
What file format does StickerGiant prefer?
Vector files such as SVG, AI, or EPS provide the cleanest cutlines and sharpest print results.
Can I design Clear Labels or Holographic Stickers in Canva?
Yes. Just ensure your artwork includes proper transparency and bleed. Export SVG if available for best precision.
What DPI should images be?
Use 300 DPI for any raster artwork or photos placed in your Canva design.